Mitsubishi FH140 restoration pt 7


|
|
|
|
|
|
|
|
Even I was getting worried that the final paint finish was never going to take place, but the day finally came when I was able to get the job done and dusted…
I have to admit to being a tad concerned that my first attempt at finish-coating a vehicle was going to end in tragedy, especially because this job was being done in metallic lacquer just to add another potential disaster to the mix.
My good mate Murray Firth had come to the party when painting my dear old K Bedford, however, I was determined that I wasn’t going to call upon his services this time around.
I’ve never made any secret of the fact that I don’t have a spray booth do these paint jobs in and that I simply have to rely on ‘Huey’ to be benevolent and provide me with a warm and relatively sunny, breeze-free day in which to get stuck in and get the job done.
I know that is a big ask, given the fact that all this work is being carried out in Auckland where the weather is notorious for its unpredictability.
I guess I’m just lucky to have been provided with a particular spot in the region where there is a tiny microclimate that seems to come up trumps on an unbelievable amount of occasions. Anyway, on one particular Wednesday, it dawned bright and shiny, and I thought to myself "it’s now or never, so let’s do it".
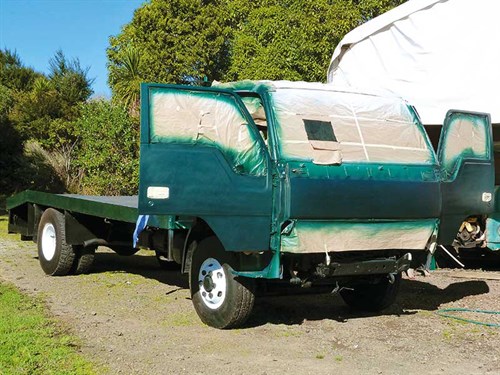
I’d spent a considerable amount of time sanding, then priming and doing it again and again, until I felt I’d be giving myself the best chance of getting a half-decent finish coat on the vehicle.
The whole affair had been a bit of a step change for me, as on the first restoration (my K Bedford), I’d relied heavily on my engineer mate Dean Southey to do all the most difficult welding work, and of course, as I’ve previously explained, I had copped out of the majority of the paintwork by palming that off to my other long-suffering friend Murray.
This time though, I was on my own. Although, if I’m perfectly honest, I could have called on Murray to dig me out of the crap if it became entirely necessary.
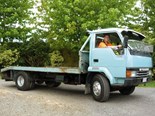
I have to explain here that prior to painting the main body of the cab, I had got a half-decent coat of enamel white on the wheels, the front bumper, and the roof.
As I explained in a couple of stories back, I wanted to try to keep a general theme of a fleet colour by using the K’s livery as a baseline, but at the same time not making a 1990s Mitsubishi look like something out of the 1950s. Hence, the departure from the old black and green, and of course, the addition of the metallic finish.
The dilemma I face now is how to put a face on the next restoration (which will also become a fleet vehicle)—a 1960s weird-looking FGK30 Morris. However, I think I’ll worry about that later in the year.
With this being my third restoration, I’m slowly coming to terms with the fact that this one too is almost over.
In fact, I’d suggest that this will be the penultimate article on the Mitsubishi restoration as there are only a few finishing details to take care of before time is ‘called’ on this particular job.
Where the restoration is currently at
Having just sat down yesterday to make a list of bits and pieces required to finish the job off, I can now share the list with you. Here it is:
- Final fit-off of the front bumper (I’ll share an idiosyncratic story about that in a moment)
- Fit an air horn (another funny story)
- Cut and polish paintwork
- Apply signwriting
- Final upholstery touch-up
- Remedy left front indicator not working
- Fit mud flaps to front mudguards
- Fit revolving orange beacons to headboard
- Attend to anything else I haven’t thought of (you can rest assured there’ll be a decent-sized list here)
- Final detailing
Even though the truck wasn’t quite complete, I simply couldn’t turn down a couple of jobs that came in a week or two ago.
Strangely enough neither of them were transporter jobs as such. One job was to deliver 50 six-metre sheets of roofing iron and the other a timber delivery.
So off I set, with a not quite completed truck, to carry out the tasks.
Although I’d already painted the bumper, I couldn’t for the life of me figure where I’d put the four bumper bolts. So I rattled around the workshop and found four bolts that would do the job, at least in the meantime. The fact that the final fit-off of the bumper heads my list of things to complete the restoration is entirely due to my inability to track down four miserable gutter bolts that for approximately three weeks have been lost in an area of about 50 square metres. Unbelievable you might say!
My ability to misplace things is a bit of a joke among my colleagues, but this incident takes the cake. I guess I’ll have to go searching for something else I’ve ‘lost’ in order to find those bloody bolts. Well that’s the way it usually happens, isn’t it?
I’m about to embark on an exercise of turning a negative event into a positive outcome, which will see the truck fitted with an air horn.
Way back when I was using a wire brush to clean the front of the chassis, I accidentally ground through the wiring to the horn.
The incident was the cause of some choice language at the time. That was until I realised that I thought the tone of the horn was more befitting of a moped than that of a truck.
A bit of further searching revealed that there were the remnants of an after-market air horn sitting right up under the bumper, thus prompting the thought of reinstating a more effective warning device.
Fitting the air horn is going to be a priority for me, as the next job booked in is to take another project we’ve been working on to Hamilton for certification.
The trip will provide me with a fitting end to the Mitsubishi restoration, as it’ll be a trip down memory lane, given that I spent the better part of 20 years of my life tooling the route on my daily Auckland to Hamilton run.
I’m really looking forward to it!
Tip of the month
Always have a system in place to ensure you don’t lose components during restoration.
Keep up to date in the industry by signing up to Deals on Wheels' free newsletter or liking us on Facebook.

.jpg)


.jpg)


.jpg)