Restoration: Ford D750—Part 19
The latest in the Ford D750 restoration saga
Everyone who has been following this saga will know that yours truly is absolutely no stranger to making a fool of himself in the public arena, a classic example of which took place in Part 18 last month.
For the benefit of anyone who’s reading about this for the first time, in last month’s instalment, I made a statement that would’ve set off a reaction from the restoration fraternity, with the guys and gals quite rightly asking why this silly old fool isn’t considering hanging up his overalls for good.
What I’m referring to here is the part where I said I’d become a bit work shy when it came to de-rusting the four rear wheels.
What had happened was that I’d gone out and bought a new wire brush to go on the grinder; the only thing was that it was a little bit larger than the brushes we’d used in the past.
While it would’ve only been around 20% larger than our standard issue, within about two minutes of using it, I felt that my hands were going to fly apart, prompting me to give it up as a bad job and give the sandblasters a call.
.jpg) |
|
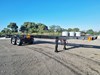
Not sure which one is in the most need of restoration
|
While my restoration buddy Murray and I do have a small sandblasting unit, I knew that I’d be there forever-and-a-day using our kit, so I figured it’d be best to leave this one to the professionals.
It was just before Christmas when everyone would be off taking a well-earned break, so it was obvious that some other tasks would have to be slotted in while I waited to find a blaster who could do the job.
While working on cleaning a part of the chassis with one of the small grinders—of which Murray and I have about eight between us (no such thing as too many grinders)—I decided to have another go on the wheels with the smaller grinder and brush combination.
Why I’d never thought of trying that in the first place I’ll never know, but it worked a treat and within about 20 minutes, I had one side of the first of the four wheels done and dusted. Only seven more sides to go, but at least it was a start.
Suddenly, a job that at first looked like it would take forever became relatively insignificant in the grand scheme of things.
Perhaps I should explain that the modus operandi for the rear wheels was entirely different from that of the front wheels, a job that was carried out earlier in the restoration.
The front tyres were shot, so because they had to be replaced, I had those wheels (along with the spare) sandblasted inside and out.
As there’s a slim possibility that the rear tyres could pass a COF, I’d decided to leave them intact for the time being and simply give the wheels a spruce up.
The big deal I made of finishing off on the wheels and nuts, although appearing to be relatively simple to the casual observer, is nonetheless quite important as far as this particular old restorer is concerned.
.jpg) |
|
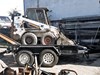
Slowly coming together
|
While cleaning, priming, and finish coating the aforesaid doesn’t sound like a lot of work, it is a time-consuming affair. I sat down and totalled up the actual time taken with each wheel nut and estimated that on average, each nut took about 10 to 15 minutes from start to finish to complete.
When you consider that there were 42 of them (if you include the spare wheel nuts), there’s almost a day’s work in that part of the operation alone.
Anyway, enough of the bleating. Now that that dirty part of the job is out of the way, I’m able to turn my attention to some of the cleaner parts of the job at hand; interesting things such as fitting all the parts that were cleaned, painted, and put aside on the finished products shelf awaiting the day that they can be reunited with the parent vehicle.
Some of these jobs were carried out many months ago, mostly on rainy winter days when it was too uncomfortable to work in the open part of the workshop.
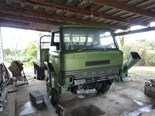
Refitting components is perhaps the most enjoyable part of any restoration, not only because it’s pretty clean work but also—and more importantly— because it usually makes speedy headway. Unfortunately, the photos provided with this instalment will probably give a false impression of the state of completion the truck is currently in. While it might look bright and shiny on the outside surfaces, there’s still a fair bit of work to get out of the way before that trip to the testing station can be considered.
There are still the combing rails to prep and paint, along with a good portion of the inside of the chassis rails and the diff.
Prior to Christmas, I’d intended calling in a mobile sandblaster in order to get the work out of the way more quickly, however, as I’ve nibbled my way through the cleaning, I can now see some light at the end of what last month appeared to be a very dark tunnel.
The desire to save as much money humanly possible as the restoration comes to an end is a significant driving force, so it’s now just a matter of knuckling down for another month or two.
.jpg) |
|
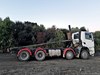
The last wheel nut going on the last wheel
|
Also, there are still a number of mechanical issues to work through, things such as the exhaust manifold, which continues to provide a few headaches.
The repair Murray and I carried out on the aftermarket manifold sadly hasn’t produced the result we were hoping for, and I’m sure this will be a thorn in my side for a little while to come.
On top of that, the weird brake system on D Series’ of this vintage is proving difficult to get my tiny head around.
However, all isn’t lost, as we have a comprehensive workshop manual that Murray and I have just started to get our heads into, which hopefully will provide all the information we’ll need to get the problem sorted.
You’ll be able to read all about that in Part 20 next month.
Keep up to date in the industry by signing up to Deals on Wheels' free newsletter or liking us on Facebook.


.jpg)

.jpg)
.jpg)
.jpg)