Restoration project: FGK Morris Restoration—Part 15
Lyndsay Whittle takes a look back at where the restoration was at a year ago
Having just arrived back at the workshop after a short break in Adelaide, my mind turned to wondering where 2017 went. It seemed to have gone in a flash, so I took a look back at where the restoration was at a year ago and turned to Deals on Wheels #282 to find out what was happening in part II of the FGK Morris restoration.
It only took me a few seconds to realise that that might not have been a clever thing to do, because as the saying goes, ‘a picture paints a thousand words’.
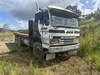
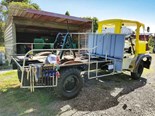
I sat and stared at the photos I’d taken of the two trucks I’d collected from Albury in the South Island approximately a year ago, and to my dismay, I found that the truck I’ve now been working on for a little more than a year looked more complete then than it does right now.
But I realised that under the façade of a nearly complete truck in 2016 was a battered and rusty heap of metal. However, restoration is only a part-time job for me at best, and if I spent 40 hours a week on the task every single week, then the job would probably be finished by now.
Looking back
In order to get the truck back to where it is now, I’ve had to remove the original flat deck, clean and paint the chassis, and remove both the front and rear axles in order to replace all of the spring shackles. All of the hydraulic brake and clutch systems have had to be overhauled, although, I did get a lucky break (no pun intended) when I found the brake drums and linings were all in good nick.
Another bit of luck came my way when all I had to do to get the engine running was to pour some light oil down the bores and turn it over with a crank handle a few times, put some petrol in it, and fire it up.
To my surprise, the engine ran smoothly and quietly—that was after I fitted a new muffler, of course. Transmission-wise, we don’t appear to have any problems either, as the clutch wasn’t frozen, as was the case with my previous restoration—my K Bedford, a vehicle that had also been sitting around for years.
Having the truck back to a state where I can now drive it around the yard, I can report that it appears to drive and steer quite nicely, albeit at very slow speeds so far. In short, I guess I’ve come through the mechanical side of the restoration fairly lightly, as even the wiring loom only needed re-sheathing in places, given that the core wiring was still shipshape with the different colours all still looking bright.
The truck had been retrofitted with an alternator, which I decided to keep mainly to keep the costs down on the charging side of the equation. Although, I found it was cheaper to buy a new alternator than it was to repair the old one.
Also, the windscreen wipers weren’t working, so I had my auto sparky mate Areo Litherland attend to that while he was sorting out a few other electrical issues, the upshot of which is that we now have a charging system that works and a truck that is more or less driveable at this current point in time.
When I say "driveable", what I really mean is "moveable", as I’d fully expect to be in big trouble if I tried to drive it on the road right now. While the story of the mechanical part of the restoration can be told in a few paragraphs, it doesn’t take into account the countless hours spent undoing, cleaning, and replacing thousands of nuts, bolts, and washers, not to mention the components they hold together.
Of course, once it’s all come apart, it all has to go back together in logical order, which isn’t always as easy as it sounds.
Rebuilding components
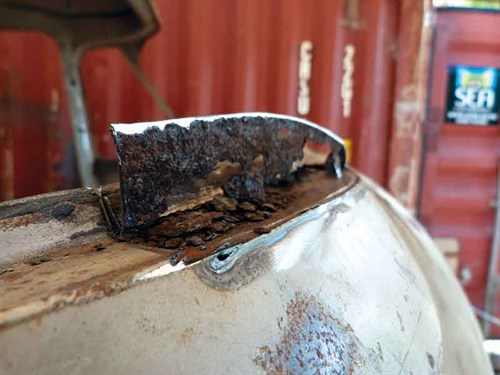
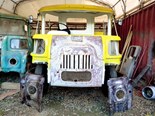
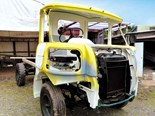
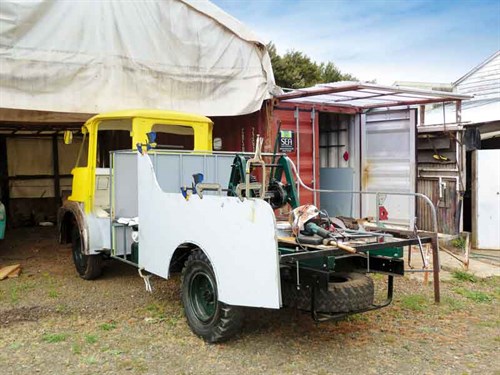
Relative mechanical simplicity aside, it was a different matter when it came to the bodywork. Although it’s fair to say that everything on the cab above the front mudguards (or wings—the jury’s still out on that terminology) was in a relatively good condition, the same couldn’t be said about the subframe, which in places had been completely rusted away, to the point that it was difficult to tell what it was supposed to look like.

This was a bit of a problem for me, given that I had no experience in this area and was even more complicated by the fact that I often had to hazard a guess as to what shapes I was supposed to be manufacturing, although the donor truck sitting beside did provide clues in some instances.
Okay, I’ve been around trucks for a major part of my life and I’ve naturally had to apply some of that good old Kiwi ingenuity in order to get the truck safely home on many occasions.
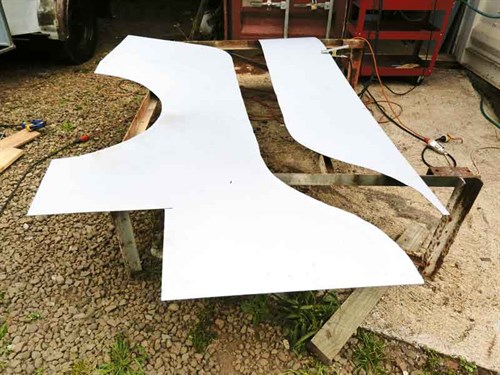
To that end, a lot of mechanical stuff isn’t too much of a problem, but when it comes to rebuilding body components, well that’s another story. Anyway, long story short, remodelling the cab took a bit of effort and aside from having to get my old panel beater mate, Tony onto the wings—we’ll call them ‘wings’ for ease of reference—and getting a swaged floor panel made by Mark at Alpine Panelbeaters, I’ve pretty much done the work myself.
Oh, I’d be remiss if I didn’t also mention my restoration buddy Murray and Bob, the certifying engineer who is generously supplying guidance along the way.
Then and now
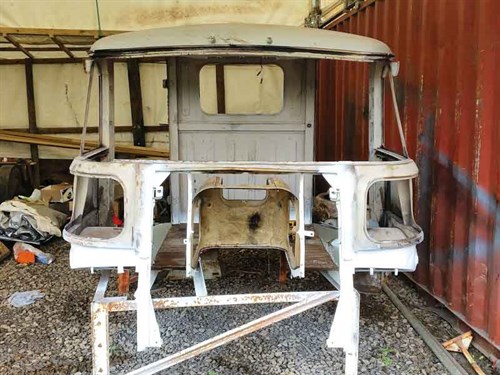
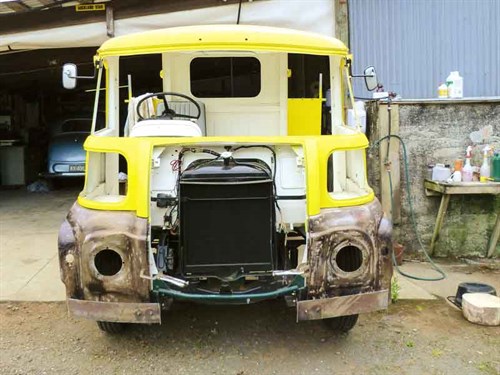
You’ll see that I’ve provided some photos of the state the truck was in exactly a year ago, along with some current ones that show I’ve at least fulfilled my promise from last month, showing that the wings did fit up to the truck rather nicely just as we’d expected they would.
I’ll leave it up to you to decide whether or not I’ve been dragging the chain over the past year and a bit, which of course I don’t reckon I have. But then I’d have to say that, wouldn’t I?
Tip of the month
Give it a go despite the odds.
Coming up
Will the glass fit back in the hole?
Keep up to date in the industry by signing up to Deals on Wheels' free newsletter or liking us on Facebook.

.jpg)


.jpg)