Restoration Project FGK Morris Restoration Part 6


.jpg)
.jpg)
.jpg)
.jpg)
.jpg)
.jpg)
|
|
|
|
|
|
|
|
The latest chapter in Lyndsay Whittle's restoration project
To date, I felt I’d been cruising along with this restoration, as things were going more or less according to plan, aside from the minor hiccup here and there, including the broken windscreen I mentioned in last month’s issue. And, of course, the ever-present threat of having to dip into the bank balance, with all the stress that entails.
Anyway, I’m supposed to be a big boy and I shouldn’t have started another restoration project if I wasn’t prepared to spend some money along the way. Rant over, so I guess I’d better get on with the story.
The new front shackle pins and hangers had been delivered back to me and refitting the front axle took less than a morning to complete. It was soon after that, I was able to put the freshly painted engine and gearbox back in place.
All this flourish of activity in less than a day made me think I was making a fairly good progress. Even the front wheel cylinders had been given a good treatment by Just Brakes in Onehunga and were offered up to the truck in double-quick time.
Despite FGK Morris trucks’ notoriety for having difficult brakes to bleed (I was told this by several older mechanics), this part of the operation went smoothly. It didn’t take much time to get a good pedal up and I was feeling as pleased as punch. However, as we all know, when things are going smoothly, it doesn’t last long and the next problem was about to hit.
Having fitted the engine successfully, I knew it would run okay, as I’d given it a run prior to taking it out for cleaning and painting.
Knowing the engine would run like a Rolls Royce gave me the confidence to also fit the radiator, which I’d tested by filling it with water a month or so earlier.
As I didn’t encounter any leaks, I assumed that everything was all right in the cooling department. Big mistake there! As expected, the motor ran well but there was a small leak from the radiator. Those of you who have been following the story so far may recall
that I was deliberating whether to refit the alternator that was on the truck when I bought it, or whether I should fit an original generator.
In the final event, I decided on the alternator option (for reasons too extensive to be told here), which I fitted to the truck on the same day as I installed the radiator. So the next step was to fill the radiator and test the engine.
Even though I had the radiator sitting to one side for a day or two with water in the tank and no sign of a leak, when I fitted it up to the chassis and ran the engine for a minute, to my dismay, there was a small leak.
"No problem," I thought to myself, "I’ll simply take it out again and give it to Western Radiators and get them to fix the leak."
Well, that thought was totally off the mark, as it turned out that the core was… ah, I think there’s a technical term for it that I can’t use in this format, and about eleven hundred bucks later I had a new radiator. While the radiator was out, I had the water pump reconditioned at Muzza’s in Onehunga, so when it all went back together, we had a perfectly watertight cooling system.
So, as it stands at this point in time (six months into the restoration), we have a completely refurbished hydraulic braking system, a cooling system that we can be confident in, a refurbished hydraulic clutch assembly, an engine that runs like a dream, and new spring hangers all around.
There was a bit of a temptation for a while there to fit an apple box to the chassis and have a wee drive around Murray’s old orchard, but in reality, the logistics of driving the contraption in this state wasn’t worth the effort required.
Being a bit of a procrastinator (well a full-blown one), I’d been putting off doing any real work on the cab, but the time had come where I had nowhere else to go but to bite the bullet and get stuck in this relatively unknown territory.
All we’d done so far with the cab was to unbolt it from the chassis and lay it on its back where the tray will eventually sit.
In doing this, it was plain to see that a lot of work lay ahead in regard to repairing a quite rusty subframe.
The outer mudguards, or ‘wings‘ as the manufacturers call them, had been badly pushed around and bent and were, I figured, beyond my level of expertise to put right.
However, the immediate job at hand was to get the cab off the chassis and into an adjacent area in order to get started on the long job ahead.
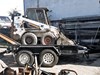
Not having a Hiab on hand and running a little low on budget at the time, Murray and I resorted to alternative measures, which would normally take a couple of pages of text to describe, so it’s probably best to apply the old adage of a picture painting a thousand words in this instance.
No sooner we had lifted the cab precariously from the chassis than I realised I had nothing to sit it on other than the ground. So a bit of old Kiwi ingenuity was soon resorted to by way of an old orchard trailer frame Murray had sitting around for years and was bound for the scrap merchant’s yard.
After pulling the frame from the long grass with my trusty Suzuki Vitara, all that was required was a cut here and there with a disc grinder and, hey presto, we had a stand of just the right height for working on the FGK Morris cab. I remember saying last month that I had a story to tell about the replacement windscreen I had in stock to replace the one I broke.
Although it’s in perfect nick, it looks like I won’t be able to get a VIN with it because it’s not laminated, however, the jury’s still out on that one and more research is needed, so I’ll keep you posted.
Coming up next month… The real work on the cab begins!
Keep up to date in the industry by signing up to Deals on Wheels' free newsletter or liking us on Facebook.


.jpg)