Restoration project: FGK Morris restoration part 5


|
|
|
|
|
|
|
|
|
|
The latest chapter in Lyndsay Whittle's restoration project
At the risk of stating the obvious, I'm in need of some help. That is aside from the fact that anybody who travels approximately 80% of the length of New Zealand and back to collect a derelict 1960s FGK Morris truck must be a prime candidate for sectioning under the Mental Health Act.
On this occasion, though, the help I'm seeking is in the form of trying to track down the previous owner of the old Morris.
As I recounted a couple of stories back, I'd purchased the truck and a larger three-tonne model on the internet from a guy in Albury in the South Island for the princely sum of $705.
Because I'd purchased the two trucks in 'as is' condition, I had the man give me
a receipt for the purchase, mainly to satisfy any policeman who might decide to stop me on the long trip back to Auckland that I hadn't pinched these two masterpieces of British engineering.
Looking back on the journey, I have to admit that it looked a little bit like old man Steptoe's horse and cart on the way to the knacker's yard. Anyway, receipt-of-purchase aside, I still don't have anything to go on by way of registration papers, except for a set of number plates for each vehicle.
I've always known that finding out about the truck's history was going to be tricky, as the guy I bought the truck from wasn't very helpful other than to tell me that it once was a milkman's truck.
Aside from that, there is some signwriting on the door that reads "Kurunui" WINCHESTER and I'd made the incorrect assumption that Kurunui was a suburb
of Winchester.
However, it's recently been suggested that it's probably the name of a farm in the area, a thought that prompted me to take a closer look at the signwriting.
Sure enough, the word "Kurunui" is written in quotes, which does tend to suggest that the previous assumption is correct.
Anyhow, if anybody can throw any light on the existence of a farm or station called Kurunui near Winchester in the South Island, I'd be eternally grateful.
Meanwhile, back in the workshop, we had the truck turned around, which gave us a change of view, as we'd been looking at its rear end for such a long time that it was good to look at a different aspect for a change.
Removing the cab was easy, as it was a simple matter of removing the floor panels and the steering wheel and undoing the four cab mounts and a few ancillary connections.
I'd already taken the vast amount of glass out of the truck and removed the doors to make everything as light as possible.
As stated in the last month's issue, it wasn't possible to lift the cab straight off its mounts due to height restrictions, so it was an easy matter of using a chain block to lift the front of the cab and roll it over on its back onto the rear portion of the chassis.
Fortunately, I was able to do this on my own as my restoration buddy, Murray, was away touring the South Island in his trusty 1931 W Bedford truck.
No, you didn't read that incorrectly. Murray did take his wife Penny away on a trip in an 85-year-old truck that he never drives at much more than 50 km/h.
For the benefit of those who are interested, they travelled on as many back roads as they could find and covered about 3500km over three weeks without any
major breakdowns.
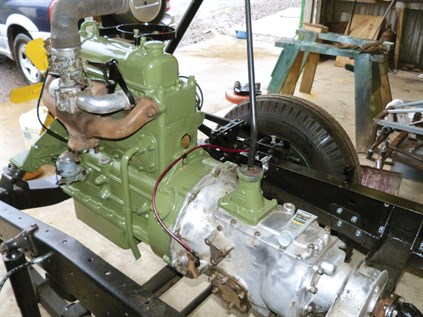
I think the only issue was a fuel tank mount that rattled loose and was repaired on the roadside. Anyway, I digress as usual.Back in the workshop again, I now had an FGK30 Morris with its cab lying on its chassis, which had been cleaned and painted right from where the back of the cab usually sits to the rear of the truck.
Also, as I said in the last month's issue, I'd run the engine, which to everyone's surprise, ran like a Swiss watch.
With all that out of the way, the next part of the process was threefold:
- Give everything that was previously hidden by the cab a good scrape and water blast.
- Check out the front suspension bushes to see if they were as bad as the rear ones proved to be.
- Take the engine out of the chassis for a clean and paint.
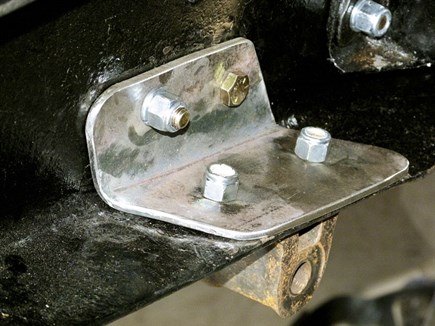
The cleaning part was, of course, the easiest bit and it revealed a fairly tidy chassis except for the bracket that holds the centre crossmember to the chassis.
The bracket was desperately in need of replacement and fortunately was bolted and not welded to the chassis.
On his return from the South Island, Murray manufactured a new bracket (he loves doing jobs like that) and it was soon fitted to the chassis, with the crossmember being attached with shiny new high-tensile bolts in double-quick time.
While Murray was working on the crossmember, I was cleaning and painting the engine, which even though I say so myself, came up a treat, didn't quite match the splendour of Murray's bracket.
Meanwhile, as far as the front suspension was concerned, it was looking like I wasn't going to get away without replacing the spring hangers and bushes.
Although they weren't quite as worn as the rear spring ones were, they were nonetheless going to have to be replaced.The fact that they weren't as bad, quite frankly was cold comfort because I knew that replacing half-worn components was going to be every bit as expensive as replacing totally munted units, and I was still smarting over the inordinate depletion of my bank account the last time around.
Anyone who has been following the story will remember my comment last month of how I was worrying over removing the windscreen and the fact that I might break it.
Well, I'd had one hell of a job removing the two smaller corner windows, which came out okay in the end, and I was agonising over taking the windscreen out.
However, when it came to removing the main screen, it popped out in about 10 minutes flat and, I might add, in one piece.
I placed it on a blanket on the floor in a corner of the workshop where it stayed for a week or more but I was ever conscious of the fact that clumsy as I am, I might trip over it and smash it to smithereens.
One day when walking past it, I dropped a screw or something of little consequence and thought to myself, "Better shift that screen to somewhere safer."
So I headed off to the storage area and prepared a bed where it'd be out of harm's way. I went back and picked it up and headed towards its new hiding place—bang!—millions of tiny pieces of the windscreen where the once was one
big piece!
I'd neglected to allow for the curvature at both ends of the windscreen, one of
which had caught on the corner of a steel workbench—a disaster you may well think.
Well, I do have another windscreen in the other truck I suppose, but that isn't going to be of any use to me, even though it's still in one piece and in good condition.
I'll tell you why next month.
Keep up to date in the industry by signing up to Deals on Wheels' free newsletter or liking us on Facebook.


.jpg)


.jpg)